
This mod is not for the faint of heart. It requires cutting away pieces of your original seating which you cant go back and reattach later. Ill be editing this post as I write it so please don't comment till it is done.
First, this idea is not all mine. I found this info here. http://www.focusst.org/forum/showthread.php?t=14996
Let me start by saying this, if you are overweight or have an extra large frame this may fix some of the issues with the seat but not all. I bought my 2013 ST as a 6' 290lb person. During the time of ownership ive dropped 70lbs but its still not enough to make thes seats comfortable.
Because the title of that thread does not represent this particular mod found somewhere on last couple of pages I thought I'd start a new post. This mod is incredibly simple if you have the right tools. 30-40 minutes per chair and that includes removal and replacement of the seat. I made a slight modification to that persons explanation to take into account the foam I purchased. Lets get started.
Tools needed: T50 Torx bit (socket type), 3/8" ratchet, 6" extension, 7mm socket, 3/8" to 1/4" converter, phillips head screw driver, flat head screwdriver, scissors, permanent marker, some kind of electric saw(recipricating or dremel tool type, hack saw with fine tooth blade)
![Image]()
Foam: $6.27 from Walmart
http://www.walmart.com/ip/Morning-Glory-Foam-Seat-Cushions-4-Pack-16-L-x-16-W-x-1-H/19397511
For this tutorial we will start with the driver since that seat is powered and has more things to remove.
1. Start by pushing the seat as far forwards as it will go to expose the torx screws. Remove the 2 rear screws with your ratchet and T50 torx. Place the screws somewhere they wont get lost like the drink holder. Slide the seat all the way backwards and remove the forward 2 - T50 screws. Place in drink holder.
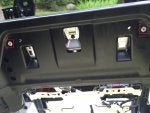
2. from the front, lean the seat straight back so you can expose the electrical connector on the bottom.
![Image]()
Using the 7mm socket unscrew the bolt in the middle of the harness. The bolt is captive so you need only unscrew it far enough to shimmy the connector off.
3. Remove the seat from interior of the car. I found this to be the easiest way.
![Image]()
slide back rest slightly out the back door. Lift up body of seat and gently rotate seat portion out the front door. Doing it this way ensure metal feet dont hit and rip any portion of your interior.
![Image]()
4a. From the rear bottom left side of the seat remove the single phillips head screw from the plastic guard.
![Image]()
4b. Gently tug the plastic away from the seat and push it down(towards the front of the seat) gently to unfasten it from the seat. Release the 4 seat direction plugs.
![Image]()
![Image]()
Dont worry about the order. They are keyed so they can only go back in one way.
5. Release the 5 cushion fasteners.
![Image]()
![Image]()
![Image]()
6. Flip the seat over (metal legs on the ground) and gently lift cushion from the front. You may need to wiggle it a bit on one side or the other to release the seat from the 2 hooks.
![Image]()
6. Now comes the fun part. Cut the plastic wings off as flush to the frame as you can. DO NOT remove the hooks.
![Image]()
7. Take the 2 wings and place them on one of the foam pieces. Trace it with a permanent marker and cut them out.
![Image]()
Place the foam plugs into the grooves in the seat cushion where the original plastic wings go.
![Image]()
8. Take second foam square and lay directly on metal seat. Remove enough foam from the square to make it lay flat.
![Image]()
9. Reattach seat to the hooks and reattach 5 cushion tabs back to seat frame.
Installation is the reverse of this procedure. 1 package of the above foam is enough to do both seats.
This is the best mod to date I have done and only makes the car more enjoyable.
First, this idea is not all mine. I found this info here. http://www.focusst.org/forum/showthread.php?t=14996
Let me start by saying this, if you are overweight or have an extra large frame this may fix some of the issues with the seat but not all. I bought my 2013 ST as a 6' 290lb person. During the time of ownership ive dropped 70lbs but its still not enough to make thes seats comfortable.
Because the title of that thread does not represent this particular mod found somewhere on last couple of pages I thought I'd start a new post. This mod is incredibly simple if you have the right tools. 30-40 minutes per chair and that includes removal and replacement of the seat. I made a slight modification to that persons explanation to take into account the foam I purchased. Lets get started.
Tools needed: T50 Torx bit (socket type), 3/8" ratchet, 6" extension, 7mm socket, 3/8" to 1/4" converter, phillips head screw driver, flat head screwdriver, scissors, permanent marker, some kind of electric saw(recipricating or dremel tool type, hack saw with fine tooth blade)

Foam: $6.27 from Walmart
http://www.walmart.com/ip/Morning-Glory-Foam-Seat-Cushions-4-Pack-16-L-x-16-W-x-1-H/19397511
For this tutorial we will start with the driver since that seat is powered and has more things to remove.
1. Start by pushing the seat as far forwards as it will go to expose the torx screws. Remove the 2 rear screws with your ratchet and T50 torx. Place the screws somewhere they wont get lost like the drink holder. Slide the seat all the way backwards and remove the forward 2 - T50 screws. Place in drink holder.
2. from the front, lean the seat straight back so you can expose the electrical connector on the bottom.

3. Remove the seat from interior of the car. I found this to be the easiest way.


4a. From the rear bottom left side of the seat remove the single phillips head screw from the plastic guard.

4b. Gently tug the plastic away from the seat and push it down(towards the front of the seat) gently to unfasten it from the seat. Release the 4 seat direction plugs.


Dont worry about the order. They are keyed so they can only go back in one way.
5. Release the 5 cushion fasteners.


6. Flip the seat over (metal legs on the ground) and gently lift cushion from the front. You may need to wiggle it a bit on one side or the other to release the seat from the 2 hooks.

6. Now comes the fun part. Cut the plastic wings off as flush to the frame as you can. DO NOT remove the hooks.

7. Take the 2 wings and place them on one of the foam pieces. Trace it with a permanent marker and cut them out.


8. Take second foam square and lay directly on metal seat. Remove enough foam from the square to make it lay flat.

9. Reattach seat to the hooks and reattach 5 cushion tabs back to seat frame.
Installation is the reverse of this procedure. 1 package of the above foam is enough to do both seats.
This is the best mod to date I have done and only makes the car more enjoyable.