Ford Focus ST Forum banner

Focus ST Backup Camera (Enabling APIM Rear Camera Option)

1 reading
123K views 124 replies 37 participants last post by  wasifmusba  
#1 · (Edited)
This is going to be a quick basis of how to install a rear view camera in a 2013 Focus ST with APIM Programming. I was going to send out my APIM to have it flashed, but being that I plan to upgrade to Sync 3 shortly I figured I'd try to figure out the APIM.

Parts to Buy

High Quality 2.4G Wireless Module for Car Reverse Backup Paking Rear View Camera $21.25
High Quality 2 4G Wireless Module for Car Reverse Backup Paking Rear View Camera | eBay

Car Rear View Camera for Ford Focus 2012-2014 Backup Reverse Trunk Handle CCD $29.99
Car Rear View Camera for Ford Focus 2012 2014 Backup Reverse Trunk Handle CCD | eBay

OBDLink MX $79.99
https://www.amazon.com/ScanTool-426...onal/dp/B006NZTZLQ/ref=sr_1_1?ie=UTF8&qid=1466383757&sr=8-1&keywords=obdlink+mx

TE Connectivity Female Terminals for Wireharness (Only need 2, but order 10 for crimping practice or issues, $1 in parts but shipping probably $6
)
http://www.mouser.com/ProductDetail...tivity/1924955-3/?qs=/ha2pyFaduhu0UmgaFJYVG5XhBT58vz5hc3LOpA%2bYD9QtuRZQKTeQQ==


22 awg multi strand wire a few feet for wiring into my ford touch harness connector

Female RCA cable End


Directions won't be really specific but should give you a brief overview, the link below will help fill in any questions (post 230)

http://www.focusst.org/forum/focus-st-electronics/27562-backup-camera-oem-install-research-23.html

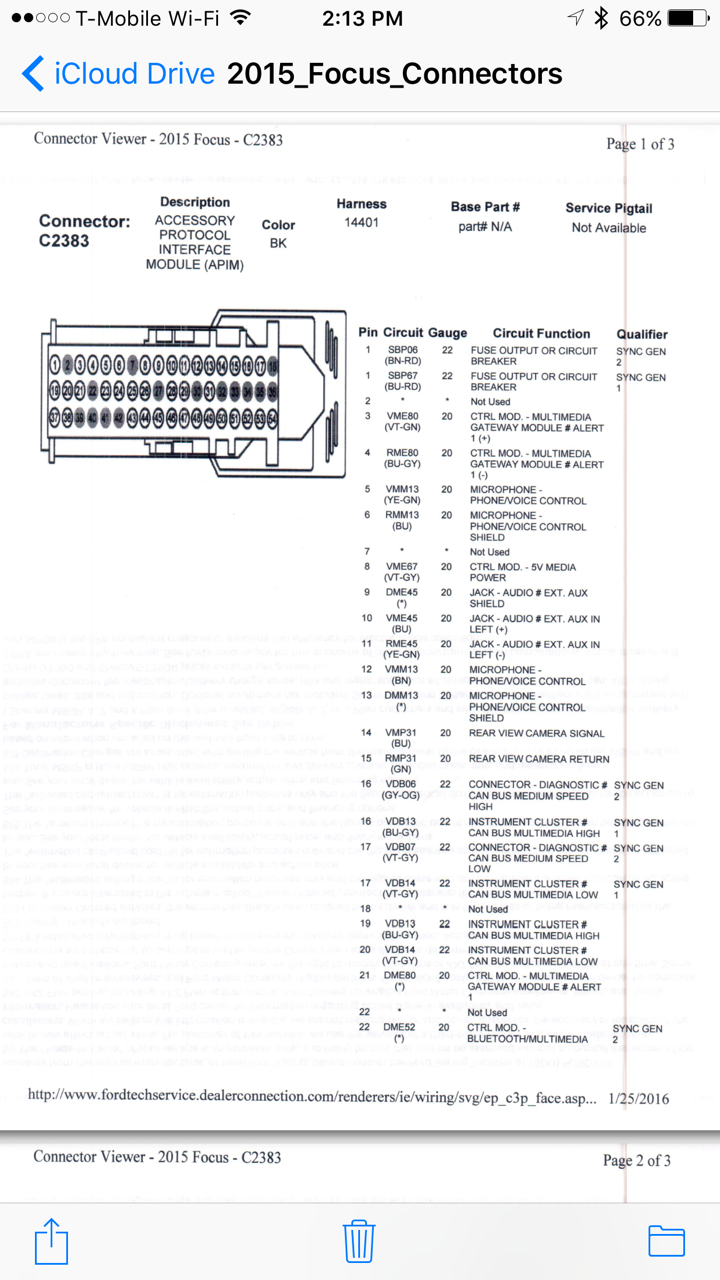
Thanks to norcalwingman pinout diagram
http://www.focusst.org/forum/attach...ctronics/126854d1459736711-backup-camera-oem-install-research-wiringharness.png


Install Backup camera in place of trunk latch handle

Take wireless rear receiver and tap red power wire into left taillight green and brown wire which is accessible in rear left hand side of car.
In the same harness the black wire is the ground so connect this with your black wire of the wireless receiver.

Now remove ford Touch from front (make sure to use tape on the leather sun visor over the myford touch. If you remove the lcd without taping, the top ears of the screen will scratch the leather when you pull it out). Take female RCA cable and keep only about 6 inches of wire length. take the insulated wire and solder it to a 6 inch strand of 22 awg wire. Do the same to the non insulated wire also. Now crimp on the end of the 22 awg wire the TE terminals mentioned above in the parts list. These can be a real pain to crimp if you don't have a crimping tool for them. You can always attempt to crimp them and then add some solder. The terminals are a real tight fit into the harness connector so you might be trying this a few times. With the TE connector ends now installed you can slide them into the my ford touch harness connector. Pin 14 should be the insulated wire from the RCA end (Center male pin) in the myford touch harness and pin 15 is the non insulated RCA end (outside part of terminal). Now the front wireless receiver RCA end can plug into the female end you just wired up to the myford touch. The power and ground wires on the front wireless module now need to be fed power. I tapped my radar detector add a circuit which is circuit 85 (could be mistaken) which is the fuse box behind the glove box.


Now to the main part which I can contribute here. Everything else has somewhat been mentioned before. The APIM behind the myford touch needs to be flashed to allow the rear camera function. To do this I recommend the OBDLINK MX as that's what I have and it works flawlessly. Now Download forscan below and it has to be the computer version. You'll need to join the forum and ask for the Free Extended license which unlocks the APIM feature.

Forscan Download link
Download FORScan

Forscan (obtaining free extended license)
FORScan forum ? View topic - Standard and Extended licenses for Windows

Now you'll need to access the APIM menu and change the digit shown in red to the number 3. Flash

host images


After Complete install and APIM flash you should see this when you put your car into reverse. The Rear camera feature comes on almost instantly and it works flawlessly.

adult image sharing


I'll see about maybe adding some more pics and stuff, but I just did the camera install along with adding an MFactory LSD to my trans so it's been a very busy 4 days. I'm exhausted but figured I'd help a few of you out.
 
#2 · (Edited)
You are the man! Someone on figured this out and has been charging a bunch to do this simple thing and won't tell anyone how, way to be a community person!

I noticed you mentioned putting tape on the screen hood, any chance you know how to fix it if you didn't? I have pulled my screen out several times swapping the APIM and wiring up a backup cam with an expensive adapter and did scruff the top of my hood. The only time you notice it is when the sun is setting and shining in from the side, but it still bugs me.
 
#6 ·
I hear you on this. I've heard and seen people literally sand leather seats with 2000+ grit sand paper with leather conditioner and then redye the seats and it restores leather seats really well. The problem here is I have no idea what the material the dash is made (synthetics/dyes/ect). You could try getting some 2000+ grit sandpaper along with some leather conditioner and find an area that is completely inconspicuous and try it out there. You'd also need to find a dye that matches the dash well. You can search on youtube for vinyl dash reconditioning and leather seat reconditioning and I'm sure some videos will come up.

Is it possible to upgrade MFT systems to sync 3??
Not the unit itself as it's completely different. I'm in the process of working on this. However, my time is pretty limited the next 1-2 months so I'm not going to get very far. I plan to look more into this around fall.

How is the camera you ordered quality built or does it look like it wont hold up for long?
The camera video quality is pretty good and I can't really complain about it especially for the cost. I would say the stock trunk release switch has a more tactile feel than the aftermarket camera. I think the aftermarket unit only has one tactile switch in the center of the trunk release where the stock unit might have 3 switch in the the trunk release. So if your hand isn't centered on the trunk release and you press it, the stock unit would unlock while the aftermarket one might.

If you're familiar with mechanical switch computer keyboards (cherry mx switches) as opposed to most common cheaper membrane dome keyboards, that's probably the best way to explain the difference between the stock trunk release switch and the aftermarket one. I'd also say the stock plastic housing of the entire switch feels a bit more durable on the stock unit compared to the aftermarket unit, but it's not that noticeable.

Overall I'd go with the same camera setup. Now if I found a unit where you could adjust camera elevation/angle, that would be cool.
 
#12 ·
So I just finished installing this and updating the APIM. Updating the APIM was the easiest part, taking off the interior hatch panel was definitely the largest pita.... If anyone has a trick to this, it would be appreciated. The OBDII reader I linked above did work for this mod and for removing the double honk. Thanks for the write up!
 
#10 ·
Seriously awesome work! Thanks for sharing! I think I'll be picking up the supplies to do this very soon.
 
#11 ·
excellent write up! I just did it this past weekend and it went perfect! I have a little interference when I reverse at home, assuming because of all the WIFI in the area, but other than that it works perfect! I did, however, tap into the rear windshield wiper motor because I didn't want to run that much wire and take off any more panels. And I was able to add the pins using the pins from a 25 pin female adapter from radioshack. slightly different looking pins, but they fit in just the same.

Again, great job! Both you and the guy in the other thread you linked to.
 
#13 ·
Everyone who has completed this how does the your screen look? mine jumps around a lot and I'm trying to figure out if it is a grounding issue or just interference because the 2.4ghz wireless spectrum is super congested.
 
#14 ·
On mine I didn't have an issue until this weekend. I went on a backpacking trip and my rear car was completely loaded up and I had a big Thule Sonic XL box on top loaded also. Once or twice while reversing I had the screen jump around for a bit. I'm assuming because the car was so packed the 6 meter range of the wireless transmitter/receiver was inadequate. I might look for a better transmitter/receiver that operates on 5.0 ghz or may consider just running a wire from the front to back. You might want to leave your panels open and see if the range of the antenna/receiver is the actual problem, or it may in fact be interference from the congested 2.4 ghz frequency.

With it being installed for over a month, I can't complain with it operating 99% spot on.
 
#23 ·
OK all, I got the el-cheapo kit from China and it looks complete and made for a Ford. However, the single instructions page was written for four different kits. Below is what I got. There is a blue wire coming out of the edge of the video cable (as seen below) for the part that connects to the plug in front behind the screen. On my instructions it has an arrow pointing out that says "ACC." I assume this means accessory, or that it should be connected to the ignition. There are also red and black power and ground wires. I looked at the pin-out on the plug and don't see anything that looks like an accessory connection but pin one is the power going into the unit. A couple things; 1) it seems logical that I should connect both the blue ACC wire and the red power wire to a power source. Would the blue wire necessarily need to be connected to a separate ACC connection? 2) Would it also seem logical to splice them into the pin #1 wire? Or would that be too much current drain on that little 20 gauge wire?
It seems a little odd that the acc wire would come out the side of a video cable, but I did check with a volt-ohm meter to make sure there was no connection between the plug and the blue wire.
Oh, and I see now why you said to get a 10-pack of the molex connectors. Good night, those are a bear. And then trying to get them down into the plug; another bear. I broke one of them just doing that. This is not for sissies or old men. Oh, wait, I am an old man.

 
#24 ·
Oh, and I did manage to get everything in the rear connected OK. It pretty much went as directed.
 
#25 ·
OK, even though no one appears to be reading this, I'll continue... if for nothing else than for posterior... oh wait "posterity."

So I spent the good part of yesterday finishing everything up. I got the wiring done in the morning (decided to go ahead and connect the blue “ACC” wire to a circuit that would come on with the ignition and ran the power wire to an always on circuit, both by using fuse taps) but my battery was going dead after leaving the doors open for 10 minutes. I figured it was better to get the battery checked out before attempting to program the APIM and possibly brick it!
Got a new battery and came back home to continue. I was trying to follow the steps outlined here but there were a few things left out. Someone should post a step-by-step here because you don’t just connect the thing and have FORscan go to the right place. It’s a little more involved than that. I eventually figured it out and got the bit or byte set and saved, then exited and reloaded to make sure it was correct. It checked out OK so next was to see if it worked. Disappointment. Like others, when I hit reverse it waits about ten seconds and says there’s a problem with the back-up camera, meaning it’s programmed right but it’s not seeing the connection. Next step is to pull the MFT and see if the receiver has a red light, meaning it’s getting power. Then I’ll go from there.
Oh, BTW, there’s an easy way to keep MFT from scratching the plastic when it’s pulled or re-installed other than having four arms or an assistant. I had some microfiber cloths in my garage so I just draped one over the top of the unit. It makes it slide right out with do damage. I did the same when sliding it back into place.
 
#26 ·
Oh BTW, since programming the back-up camera I have not been able to get my Focccus app to load the existing info so I can enable global windows and eliminate the double beep. Anyone know whats up wit dat?
 
#27 ·
I am still reading this. I did not do the wireless thing so I can't be much help there. You could just temporarily run a cable from the camera to the mft. If that works, you would know it's the wireless that needs to be sorted out. I found a similar wireless setup here. https://www.amazon.com/Wireless-Transmitter-Receiver-Reverse-Function/dp/B00I2HQCG4

It says that blue wire is "Reverse light positive". I think I did my global windows after I did the backup camera and it worked fine.
 
#28 · (Edited)
Thanks for your response @isuzudave! :)
So, WHAT says the blue wire is reverse light positive? My instructions say "ACC." To me it doesn't make sense that they would have a phono plug AND a camera positive wire unless there was also a negative wire.
I may try that direct cable trick if I can find a cable that's long enough!
Didn't have a chance to play with it yesterday; I'm still remodeling my daughter's hall bathroom.
 
#31 ·
Update; no update. I had a cars & coffee yesterday morning and a wedding yesterday afternoon. I did pull the fuse for the blue wire but it did nothing. Might have time to do more this afternoon...
 
#32 ·
When I installed my backup camera at first I used the wireless receiver. I did not use the blue wire, just put heat shrink over the end and zip tied it out of the way. I did eventually ditch the wireless sender/receiver, it would work perfect about half the time. The rest of the time it would do the 10 second thing and say there was a problem with the backup camera. I ended up just running a wire through the headliner. It was a little bit of a pain to get it from the hatch area to the rear passenger door but in the end was a lot less work then I put into the wireless POS.... Ive had it installed for a few months now with it hardwired and haven't had it fail once.
 
#34 ·
OK, something else just occurred to me; Why are there only 11.5 volts at that power connection to the wipers? I saw this in the pictures in another thread but I just had a "Ding!" moment. Maybe it's not full battery voltage there? I even checked mine and got the same thing. I think I'll try running a power wire down to the backup lights and see what happens before I get all crazy and run a wire all the way up front.
 
#35 ·
I ran the power for my camera and sender to the driver side reverse light and I still had issues with the wireless sender not always working.

I bought a really long VGA cable and separated one wire from the three. I bought a new male VGA end because I think the VGA cord I bought was male to female. After running the wire, cut off the excess and soldered the new end on so the wire was a reasonable length. For fishing it though the headliner, I had some really large zip ties (3/8" wide and 2 feet long) that I taped together and fished it from the rear passenger door to the back hatch through the headliner (it was a PITA but eventually got it). I taped the wire to the zip tie and pulled it back through. The rest of the way was easy, I think all you need to do is pull off the rubber door seal and fish the wire down the A pillar and under the glove compartment.

I used the large zip ties because the plastic wouldn't scratch the paint or headliner, I got them at Harbor Freight for pretty cheap but anything like that should work.

Ill try to check back here tomorrow to see if you have any other questions.
 
#37 ·
One more update! OK, during my little escapade here my factory battery went bad and I had it replaced at Walmart. Little did I know that the BCM (Battery Control Module) would need to be reset after battery replacement. The only anomaly I noticed after replacing it was that my MFT would turn off with a "Shutting down to conserve battery" message, but there were no other indications or messages that there was something wrong. It finally occurred to me that the cause of this could be something that would cause the wireless backup camera to have issues. So, I Googled that message and found that the BCM needed to be reset. Fortunately, this is a function that can be performed by connecting a laptop running Forscan software to the OBD2 and resetting it. OK, now my MFT works OK. Lets try the backup camera. Yikes! It works! Eureka!
Thanks everyone for the help! Let this be a lesson to us all! But especially me!
 
#38 ·
Update; my previous enthusiasm may have been (was) undeserved. It's so sporadic now that it rarely works. I hate when something works perfectly after working on it and it makes you think you have solved a problem. Grrr...

I got two-day shipping on a 12-foot cord to hard wire it, but it may be a few days before I can get to it.
 
#45 ·
Update; I decided to contact the Chinese seller and see if there was a remedy. They were understanding and said they would send a replacement kit in the next few days. So, it might be a couple weeks before I have another update. Plus, I am starting a new job next week so I'm not sure how that will play into this. Patience, grasshopper...
 
#41 · (Edited)
I guess I never posted about my install. Here are my thoughts

I did this install without the wireless units and just ran the video cable up to the front of the car behind the dash. I am old school and was taught that wired always beats wireless. From reading the experiences of other people it seems like it it is much easier and less time consuming in the long run to not mess with the wireless units.

I did not tap into the rear wiper for power. I used the reverse light wire on the driver side. I thought having the camera on all the time might reduce it's lifespan. I don't know if that's true or not, but since I was already running the video wire into the cabin it was really not that much extra work to run the power cable also.

If I had to do it again (and I might still change it) I would not use the camera that replaces the stock hatch release/plate light. I think it aims too low. I would get an adjustable camera. You would have to drill into the plastic facia to the left or the right of the stock hatch release handle, but I saw kits on ebay that even include the drill bit. something like this. https://www.amazon.com/Universal-Degrees-Adjustable-Parking-Monitor/dp/B014PD4Q3O/ref=sr_1_1?ie=UTF8&qid=1479252064&sr=8-1&keywords=adjustable+backup+camera

The only snag that I hit was that I originally used wire that is too big for the connectors that need to be pushed into the factory harness. I used some wire I already had. It was unmarked, but looked small enough. The connectors got stuck halfway in because the wire with the insulation would not fit into the hole in the harness. The connector went in far enough that it was locked in and I could not pull it out. I almost destroyed the factory plug on the harness to get it out. I ended up getting 22 gauge wire, and it was perfect.
 

Attachments